

Easy to build sawhorse desk is doable by most any DIYer! Using standard off the shelf lumber, a premade project panel for the tabletop, you can build yourself a solid wood sawhorse desk for a fraction of retail costs! Features two large bottom shelves, two smaller shelves. Full plans include everything you need to build for yourself with step by step diagrams, shopping and cut list


Why We Built this Project
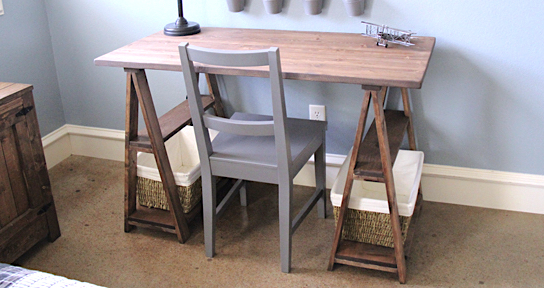
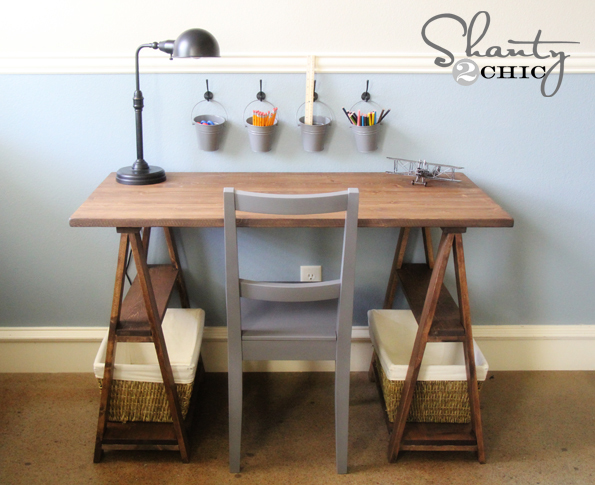
My friend Whitney from Shanty2Chic wrote me about building a Sawhorse Style Desk for her son's room, I had just the plan for her!

Much better!

This entire room is DIY! Find the Free Plans
You can get more building plans/details on:
Tips and Tricks for Building this Sawhorse Desk
Here's from Whitney:
I am so happy with this desk! It cost me under $60 to build which is 1/10 of it's cost at RH Baby.... Woohoo! It was extremely easy to build, and I loved using the project panel as a desktop. I think this desk works great for my 6 year old and will easily grow with him for many years... If I don't steal it for my own room! ;-)
There's a few tricky cuts, but I know you can master them. Just follow along with the plan, read through very carefully and make sure you understand each step before getting your saw out. And I know you will have yourself some beautiful sawhorses in no time at all! In this plan, I just use a standard 24" x 48" project panel available at most hardware stores. But for you can also use a 1/4 sheet of 3/4" plywood, boards, Kreg Jigged together - even an old tabletop or door! Make this plan your own and build it to suit what you have on hand.
PS - Wanna see what a DOUBLE sawhorse desk looks like?

image from Tommie and Dellie
Free Plans to Build your Own Sawhorse Desk

Preparation
- 4 - 1x3 @ 8 feet long
- 1 - 1x6 @ 4 feet long
- 1 - 1x12 @ 4 feet long
- 1 - 24" x 48" pine project panel
- 8 - 1x3 @ 29" Both ends beveled at 10 degrees off square,ends are parallel to each other, long point to short point measurement
- 4 - 1x3 @ 9 3/8" Both ends beveled at 10 degrees off square, ends are NOT parallel to each other, long point to long point measurement
- 2 - 1x3 @ 24"
- 2 - 1x12 @ 24" corners are notched out - ASSUMES 1x12 is 11 1/4" wide - adjust if yours is not
- 2 - 1x6 @ 24" corners are notched out - ASSUMES 1x6 is 5 1/2" wide - adjust if yours is not
- 4 - 1x3 @ 4 1/2" Both ends beveled at 10 degrees off square, ends are NOT parallel to each other, long point to long point measurement
The success of this plan is greatly dependent on being able to make nice beveled cuts. A miter saw is highly recommended for all beveled cuts.


Please read through the entire plan and all comments before beginning this project. It is also advisable to review the Getting Started Section. Take all necessary precautions to build safely and smartly. Work on a clean level surface, free of imperfections or debris. Always use straight boards. Check for square after each step. Always predrill holes before attaching with screws. Use glue with finish nails for a stronger hold. Wipe excess glue off bare wood for stained projects, as dried glue will not take stain. Be safe, have fun, and ask for help if you need it. Good luck!
Instructions
Step 1

Start by marking the insides of each leg up 1 3/4". This will be the bottom of the bottom support to leg joint. Then attach bottom supports with either a Kreg Jig or with screws and glue.
Step 2

Now the tricky part that I talked about earlier. What I would do is use a precut beveled board as a guide and carefully mark out the notches. Then either use a jigsaw set for 10 degree bevel to make the angled cut or use a handsaw. The cross cut (cut that is made against the grain) is a straight cut and you can use a handsaw or jigsaw set square - don't worry if it notches into the bottom board a little - the support boards will cover all this up.
Practice first on a scrap to make sure the cut fits within the sawhorse as shown in the next step.
Step 3

Once you are happy with your cuts, attach bottom shelf in place.
Step 4

Now mark 1/2" in from each side on top boards and attach legs to top.
Step 5

Step 6

Mark each leg 16 3/4" from bottom along inside edge. This is the bottom of the bottom shelf joint. Attach in place.
Step 7

Step 8

And attach the top!
It is always recommended to apply a test coat on a hidden area or scrap piece to ensure color evenness and adhesion. Use primer or wood conditioner as needed.


Comments
MI_Guest (not verified)
Wed, 06/06/2012 - 20:59
1 x 3 Sawhorse Table
I've been looking for permanent sawhorse plans and this has the perfect thing.
I may put a third one in the middle as I'm going to replacing an old (1962 kitchen table) that holds my plants during summer, on the porch. The shelves will be great to hold extra pots, soil and the like.
JenWoodhouse (not verified)
Sat, 07/14/2012 - 10:09
Whitney does it again! The
Whitney does it again! The girl doesn't cease to amaze me!
John@RemodelingBIBLE (not verified)
Mon, 07/16/2012 - 01:09
Superb!
Absolutely one of the nicest instructionals I've stumbled upon today.
Milca (not verified)
Tue, 07/17/2012 - 04:08
Perfect way to use that IKEA tabletop that was given to me!
I have an IKEA tabletop sitting in the basement that I didn't know what to do with. Its still good, but couldn't get myself to find a use for it nor throw it out. This will be great for a secondary worktable! Thanks for the plans.
Christy Panzarella (not verified)
Fri, 08/03/2012 - 02:00
Im hoping to one day go live
Im hoping to one day go live with whitney. Lol.
Patmcfadden (not verified)
Tue, 09/25/2012 - 05:41
1x3 sawhorse desk
Any further instructions for step 4? Seems impossible to use Kreg jig and assemble at that point (get the drill and/or jig close enough). What am I missing? Thanks!
patmcfadden
Mon, 10/22/2012 - 19:02
Sawhorse desk
Can anyone provide further instruction on step 4? Using the Kreg jig to attach legs in this step seems really difficult. How do you handle that tight angle? What am I missing? Thanks.
ryan mcdermid (not verified)
Thu, 11/08/2012 - 06:09
Step 4 help
Kreg has a driver that is longer. Something like 5 or 6 inches. I didn't have any issues with the angle and I was worried as well. The other thing you can always do if your drill is too big to fit in there is to use a scew driver that accepts different scre heads and fit the kreg driver head in there and hand tighten.
Jake
Sun, 01/20/2013 - 19:24
FLOR Catalog
If anyone is interested I was looking through the latest FLOR Catalog (floor coverings) and on page 41 is the sawhorse desk.
Jake
Sun, 01/20/2013 - 19:28
Regarding Step 4
Personally I would just drill the PHs on the outside of the legs, fill them with vinyl spackling and then paint. You will never see them and you eliminate the hassle of trying to use a screwdriver with the square bit or a power drill in the tight space. Also if you stain the PH is really kind of artistic.
n0rse
Sun, 05/12/2013 - 22:19
Have spare 1x3s = this is a sawhorse?
What do y'all think? Would like two standard use sawhorses out of this. Thanks!
Jorge Velasquez
Mon, 10/14/2013 - 21:06
Can't do the beveled cuts!
I totally love this project, which is why right after reading it I went to the hardware store and bought myself a jigsaw and some lumber to start making it. However, after trying many times to do the beveled cuts for the legs (and just for the legs), I haven't been able to make the first straight cut! Any tips on how to do it? Is a jigsaw the right tool for the job? I really can't afford to buy a mittered saw just for this! Any sawhorse plans that don't require beveled cuts would be great too!
Kevin Wentworth
Thu, 08/11/2022 - 09:55
BEWARE STEP #4.....Pocket holes needed!
Would be helpful to see revised build instructions on Step#1 to include drilling the pocket holes needed at the tops of the legs during Step #4. This would make it far easier than trying to drill the holes after the bottom support and the bottom shelf are installed.